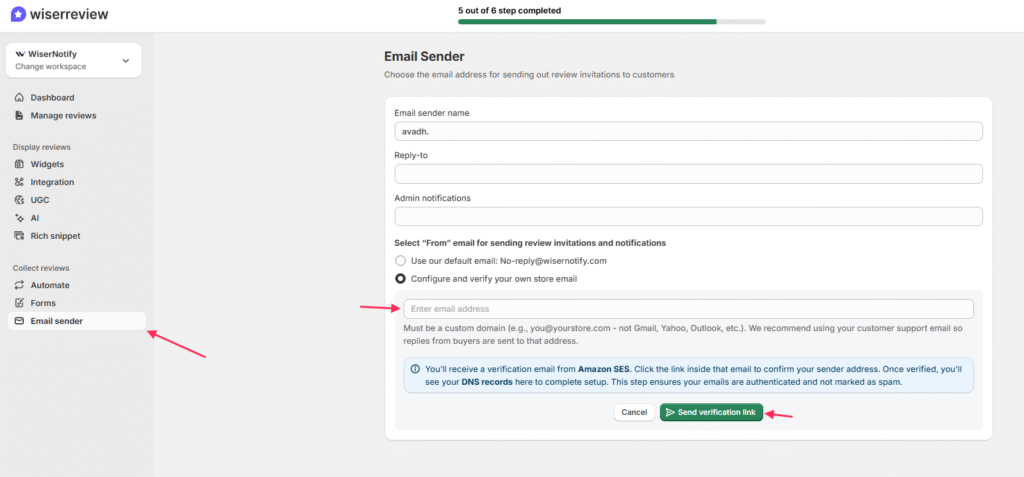
You can send review invitation emails using your own verified store email or the default WiserReview sender.
Follow the steps below to configure and verify your sender email.
Step 1: Choose the Email Sender Option

In your WiserReview dashboard, go to Settings → Email Sender.
You’ll see two options:
-
Use our default email: No-reply@wisernotify.com
-
Configure and verify your own store email
Select “Configure and verify your own store email.”
Step 2: Enter Your Email Address
Enter your custom store email, such as reviews@yourstore.com.
Make sure it’s a domain-based email (not Gmail, Yahoo, or Outlook).
Step 3: Verify Your Email Address

- After entering your email, click Send verification link.
- You’ll receive a verification email from Amazon SES.
- Open that email and click the verification link to confirm your sender address.
Step 4: Check DNS (DKIM/SPF) Records (Optional)
- Once your email is verified, WiserReview will show you DNS records.
- These records help authenticate your emails so they are not marked as spam.
- Add the provided TXT and CNAME records to your domain’s DNS (for example, Cloudflare, cPanel, or GoDaddy).
Step 5: Wait for Verification
- After adding the DNS records, click Check verification status in your WiserReview dashboard.
- You’ll see a confirmed status once DNS verification is complete.
- This process may take a few minutes, depending on your DNS provider.
Step 6: Start Sending Review Emails
After verification, WiserReview will send all review invitation emails using the verified store email address.
This ensures:
-
Higher email deliverability
-
Branded communication
-
Better trust with customers
Tips
-
Use your support or info email (like
support@yourstore.com) so customers can reply directly. -
You can use dnschecker.org to verify that your DNS records have been updated correctly.