In WiserReview, you can easily customize your branding settings to ensure that your review request emails and other communications align with your brand identity. This guide will walk you through how to update your brand logo, define your brand colors, and customize buttons within the WiserReview platform.
Steps to Customize Branding
1. Set Up Your Brand Logo

Location: Branding -> Set Up Your Brand Identity
Instructions :
- Go to the “Branding” section.
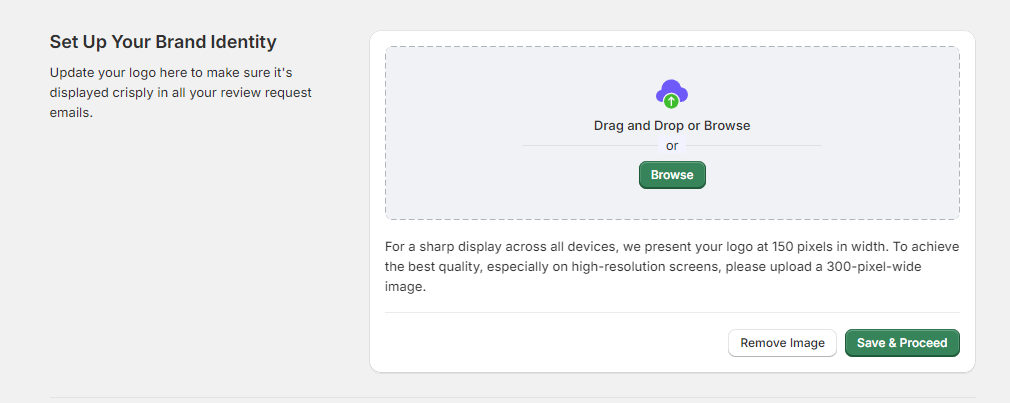
- Under “Set Up Your Brand Identity,” click on the ‘Browse’ button or drag and drop your logo into the specified area.
- For optimal display across all devices, ensure your logo is 150 pixels in width. For high-resolution screens, a 300-pixel-wide image is recommended.
- Click ‘Save & Proceed’ once your logo is uploaded.
2. Define Brand Colors

Location: Branding -> Define Brand Colors
Instructions :
- Set your primary and secondary brand colors using the color selection tools.
- The primary color is typically used for your main elements, while the secondary color serves as an accent.
3. Customize Buttons

Location: Branding -> Buttons
Instructions :
- Choose your button color and button text color to match your brand style.
- Select the shape of your buttons from the drop-down menu; options include sharp, rounded, etc.
- You will see a preview of how the button will look. Make adjustments as needed to align with your brand aesthetics.
4. Customize Star Ratings

Location: Branding -> Stars Section
Instructions :
- Navigate to the “Stars” section in the WiserNotify dashboard.
- Choose a color for the star ratings by selecting the color box next to “Star color”. A color picker will appear for you to choose your desired shade.
- Select the style of the stars from the “Star Style” dropdown menu. Options include styles like with or without borders, sharp, or rounded edges.
- The preview window will show how the stars will appear based on your selections.
5. Enable and Customize the Verified Badge

Location: Branding -> Verified Badge Section
Instructions :
- Scroll to the “Verified Badge” section.
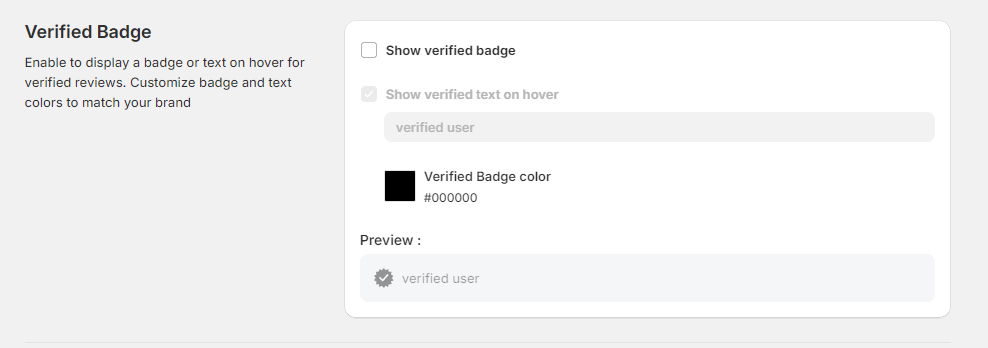
- Toggle the switch to enable a badge or text display on hover over verified reviews.
- To show the verified text on hover, check the “Show verified text on hover” box and input the text you want displayed, e.g., “verified user.”
- Set the badge color by clicking the color box under “Verified Badge color”. Choose a color that stands out against your site design but remains consistent with your branding.
- Preview how the badge or text will appear on hover in the preview section.
6. Update Shop Name

Location: Branding -> Shop Name Section
Instructions :
- Locate the “Shop Name” field at the bottom of the page.
- Enter the correct shop name you want to appear in the review collection email. This ensures all communications are correctly branded and recognizable to your customers.
7. Configure Email Sender Settings

Location: Branding -> Email Sender Section
Instructions :
- Go to the “Email Sender” section.
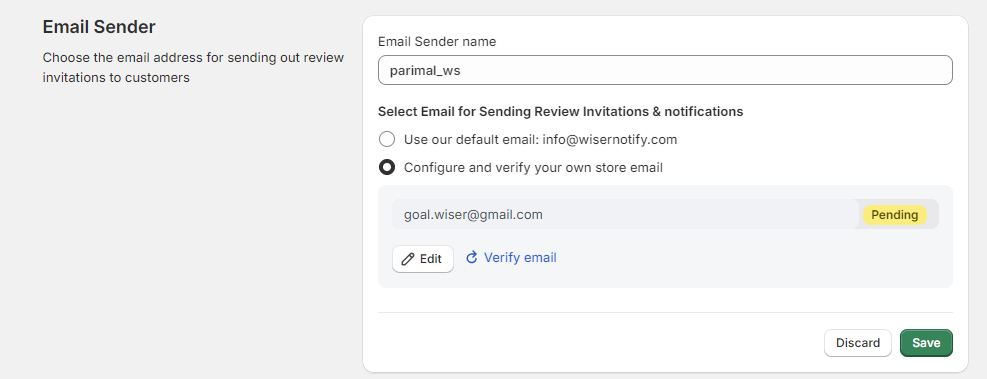
- Enter the desired “Email Sender name” that will appear when sending out review invitations.
- Choose how you wish to send review invitations: use the default email provided by WiserNotify or configure and verify your own store email. If you select to use your own email, follow the prompts to configure and verify this email for use.

Instructions :
- Choose “Configure and verify your own store email” by clicking on the corresponding radio button.
- Enter the email address you wish to use in the provided text box. This should be an email that represents your store’s domain for authenticity.
- If you need to change the email, click the “Edit” button, modify the email address, and then click “Save”.
- Click the “Verify email” button. A verification email will be sent to the email address you provided.
- Check the inbox of the specified email. Follow the instructions in the verification email to complete the process.
- After completing the email verification, return to the Email Sender settings to ensure the status has changed from “Pending” to “Verified”.
- Once verified, click the “Save” button to apply the changes.